Gestão de contas
O Gerente de Contas é uma extensão paga da Conta premium que como finalidade ajuda-lo a gerir suas aldeias quando possui já uma conta com largas dimensões. Assim sendo, esta opção só estará disponível quando possuir 20 ou mais aldeias.
Você pode ativar o Gerente de Conta usando os seus pontos de premium. Para isso, selecione o menu Premium, no menu superior e de seguida selecione a opção Gestor de conta.
Visão Geral
A Visão Geral fornece informações sobre o estado do seu gerente de conta e o que o mesmo está actualmente a fazer. Cada caixa contém informações sobre uma parte diferente do gerente de conta. Poderá move-los e arrasta-los, colocado-as na ordem em que preferir.
Clicando no ícone da Ferramenta, que aparece no canto superior esquerdo, poderá selecionar o número de itens e caixas que pretende ter visíveis na visualização geral.
Saques mais recentes
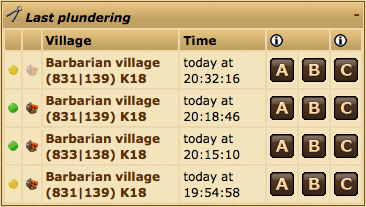
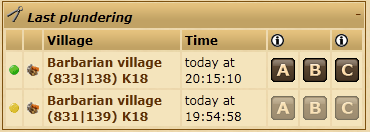
Este elemento pode ser usado juntamente com o assistente de farm e facilita o envio de ataques para saquear para às aldeias saqueadas recentemente. Mostra as aldeias bárbaras que foram recentemente atacadas e os saques de recursos.
Para mais informações sobre os icones A ,B e C, consulte o assistente de farm.
Visão geral da aldeia
No painel de visualização geral da aldeia, os pontos coloridos indicam o estado do gestor de tropas, gestor de aldeia e gestor de mercado. O ponto verde incida que o gestor está activo na aldeia. O ponto cinzennto mostra que as tarefas não estão planeadas, e um ponto amarelo indica que a aldeia está a ser gerida, mas que o gestor está em pausa.
Carregar num ponto verde ou amarelo irá pausar/reiniciar o gestor para uma aldeia, e carregar num ponto cinzento irá levá-lo ao ecrã da conta de gestor relevante para essa aldeia.
Modelos de Construção
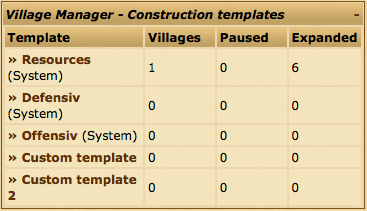
A secção de modelos de construção fornece uma visão geral de todos os modelos dos Gestores de Aldeia.
Pode ver o número de aldeões designados para cada modelo, quantos desses aldeões estão em pausa e o número de actualizações nos edifícios que estiveram em fila.
Avisos e Recomendações
Se a sua quinta estiver em capacidade máxima ou se o armazém estiver cheio, por exemplo, será notificado aqui.
Notificações
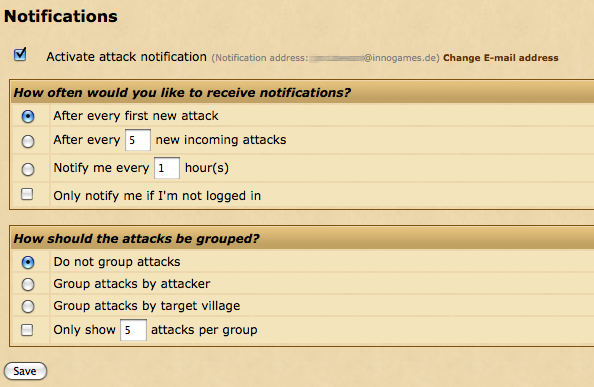
No ecrã de notificações, pode estabelecer que o gestor de conta lhe envie um email quando houver ataques eminentes. Para activar notificações de ataque, mexa na carregue na caixa que diz "activar notificações de ataque". Isto irá permitir que ajuste as suas escolhas mais especificamente.
As opções estão divididas em dois sectores.
com que frequência quer receber as notificaçoes?
A primeira parte lida com as condições sobre as quais gostaria de receber as notificações por email sobre ataques.
| Depois de cada primeiro ataque | Será notificado quando a conta de ataques vindouros aumente de 0 para 1. |
| Depois de cada (XX) novo ataque | receberá uma notificação cada vez que o número (XX) de novos ataque sseja enviado para a sua aldeia. |
| Notificar-me a cada (XX) hora(s) | Receberá apenas uma notificação por cada número (XX) de horas especificadas. |
| Apenas notificar se eu estiver logged in | Se verificado apenas receberá uma notificação se não estiver currentemente logged in ou se a conta estiver inactiva. |
Como devem os ataques ser agrupados?
Esta parte lida com a parte do conteúdo das notificações de ataque.
| não agrupar ataques | Os ataques serão mostrados por ordem, sem agrupar. |
| agrupar ataques por atacante | Ataques serão exibidos de acordo com o nome do atacante. |
| Agrupar ataques por aldeia-alvo | Os ataques serão agrupados de acordo com a aldeia a que são direccionados at. |
| Apenas mostrar (XX) ataques por grupo | A notificação apenas incluirá o número escolhido (XX) de ataques de cada grupo. |
Gestor de Aldeia
O gestor de aldeia pode ser usado para automatizar a fila de espera dos edifícios na sua aldeia. Pode personalizar o nível de edifícios-objectivo a atingir e por que ordem devem ser colocados os edifícios na fila de espera, usando o sistema de modelos.
Gestão de Modelos
Por norma, quando se abre o Gestor de Aldeias, será exibido o ecrã Gerir Aldeias. Para gerir os seus modelos carregue em Gerir Modelos.
Modelos de Sistema
O jogo fornece três modelos padrão para usar. Estes não podem ser editados ou apagados.
Os modelos de sistema são:
- Recursos - Geralmente, aldeias bem construidas com ênfase na elevação, até nível 30, de fontes de recursos.
- Defensivo - para aldeias que produzem unidades defensivas.
- Ofensivo - para aldeias que produzem tropas ofensivas.
Criar o seu próprio Modelo
Pode criar o seu modelo personalizado se nenhum dos modelos-padrão se apropriar às suas necessidades. Para o fazer, preencha um modelo na secção Criar Modelo e escolha ora começar do nada, ora por copiar de um modelo vazio, ora copiar um modelo pré existente.
Vizualização, Renomear e Apagar modelos
Por baixo da secção Criar Modelos encontrará a lista dos seus modelos existentes. Os níveis de edifícios apresentados na tabela são os níveis pretendidos para quando o gestor de aldeias tiver completado definitivamente o trabalho na sua aldeia.
pode carregar no ícone  para renomear o modelo ou então o ícone
 ![]() para apagar. Note-se que nem sempre os modelos de sistema podem ser apagados ou renomeados.
para apagar. Note-se que nem sempre os modelos de sistema podem ser apagados ou renomeados.
Para vizualizar ou editar a ordem dos modelos carrege no seu nome.
Editar Modelos
Just like on the previous page the Summary section will show the target levels for each building.
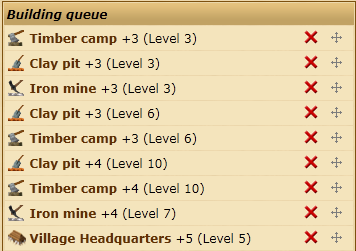
Below this, the Building queue shows the exact order the buildings will be upgraded.
The items in the Building queue list show the building to be upgraded, how many levels it should be upgraded, and the level the building will be after the upgrades have finished.
You can delete upgrades from the queue by clicking the ![]() icon. If you wish to change the order of the queue you can click and drag on the
icon. If you wish to change the order of the queue you can click and drag on the ![]() icon.
<Ω
However, unlike other sections of the game your deleted/rearranged queues are not immediately saved. You need to click on the "Save" button below to save your changes! You also need to click "Save" after adding new orders to the queue.
icon.
<Ω
However, unlike other sections of the game your deleted/rearranged queues are not immediately saved. You need to click on the "Save" button below to save your changes! You also need to click "Save" after adding new orders to the queue.
You also have the option of letting the Village Manager demolish any buildings that are higher in level than the target levels in your template. The Village Manager will only do so if your Headquarters is at least level 15 and your village is on 100% loyalty.
To add new buildings to the queue use the Add order section at the bottom of the page.
The Village Manager will queue buildings in exactly the order shown on this page. This means if you add 20 levels of Barracks upgrades in one go, then the Village Manager will do all 20 levels in a row before moving on to the next building. If you were to add 2 Barracks levels, then 2 Smithy levels, then repeat 10 times then the Village Manager will upgrade both buildings gradually
Assigning templates to and managing your villages
You can assign templates to villages and manage general Village Manager operations from the Manage villages screen.
Assigning or removing a template to a village
To assign a template to one or more villages you first need to select them by ticking the check-boxes to the left of the village names.
Then, making sure Use template is selected in the Action drop down box, choose a template for the adjacent list and click Confirm.
You can confirm that the template was assigned by looking at the Status column for the village in question. It should now say Active.
To remove a template from a village you can do the same as above but by selecting Remove from the drop down box.
You can also assign a template to a village by going into the village's Headquarters, clicking on the Village Manager tab and using selecting a template from the list in the Change template section.
Pausing and continuing the account manager
If you want to save your resources in a village then it is possible to pause the Village Manager without having to remove the template.
You can do this in a similar fashion to adding a template to a village, just either select Pause or Continue from the drop down box.
You can also directly click Pause or Continue in the status column for the village.
General notes
The Village Manager will periodically check your building queue and queue new upgrades when possible. It can sometimes take a few minutes for the manager to start queuing buildings after you've assigned a template.
The manager cannot bypass building, population or resource requirements.
If a village's warehouse is not large enough for the next upgrade in the build order to be queued then it will attempt to queue a warehouse upgrade.
Similarly, if the farm is too small it will attempt to queue a farm upgrade.
The village manager allows you to process up to 50 building orders automatically in each village, after which it will pause and you must reactivate it.
Troop Manager
The troop manager allows you to automate the recruiting of units, by choosing how many units you want to build in each village. When resources are available, the troop manager will automatically recruit units for you.
You can apply troop numbers directly to villages, or you can create and save templates to keep for future use, and apply them to villages later.
Using the troop manager to recruit units
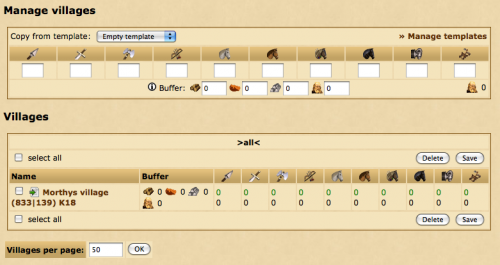
In the "Manage villages" panel at the top of the troop manager screen, enter in the number of units you would like to be built in total for one village. You can also set a buffer if you like, to reserve resources or population space. Once you are happy with your input, in the villages panel below check (tick) the villages you would like to apply this troop build to, then click save to start the recruitment process.
If you have created templates (see below for how to do this), you can apply these to villages instead of inputting a new set of unit numbers each time. In the top panel (the "Manage villages" panel), choose the template you want to use from the dropdown list. Then, in the villages panel, check (tick) the villages you would like to apply a template to. Click the save button to apply your chosen template to those selected villages.
It usually takes a few minutes for your troops to start being recruited if you have the resources and farm space available.
Buffer
You can choose to reserve population slots or resources so they will not be used by the troop manager. For example, if you set your population buffer to 100, then 100 population slots will always be kept free and the troop manager will stop recruiting new units when you only have 100 population slots left in your farm.
Creating and editing your own templates
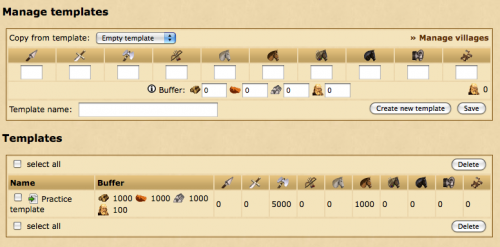
To edit templates or make new ones, click the manage templates link in your troop manager. This will bring you to the template editor screen.
Creating a new template
Enter in your desired final troop numbers into the units input boxes, and give it a name in the "template name" field. You can also set a buffer value for this template. Once you have done this, click "create new template" to save the new template.
Editing an existing template
To edit an existing template, click the green edit icon beside the name of the template you want to edit in the templates panel at the bottom of the screen. This will insert the template information into the area above. Adjust the troop numbers and buffer as desired, and then click "save".
Applying templates to villages
Once you have created a template, you will need to apply it to a village to get it to start recruiting units. You can do this from the main Troop Manager screen.
In the top panel (the "Manage villages" panel), choose the template you want to use from the dropdown list. Then, in the villages panel, check (tick) the villages you would like to apply a template to. Click the save button to apply your chosen template to those selected villages.
Deleting templates
To delete a template, check (or tick) the box beside the template name, and click "delete".
Market Manager
The market manager allows you to set up automatic resource transfers between your villages that are sent at predefined times.
Creating a new trading route
Please note that when you create a new trading route the sending village is your currently selected village.
To create a new trading route, either enter the coordinates of the target village in the Destination section or use the Favorites, Your own or History helper links on the right.
Next, input the number of resources that should be transferred in the Resources section.
Lastly, you can choose when the resources should be sent. You can select any of the days of the week and you need to enter the time of day the transfer should be initiated.
Resources will only be sent if the village has enough resources and enough merchants are available.
Viewing and deleting a trading route
Once you have created trading routes you can view a list of them at the bottom of the page. You can see the next scheduled sending time to be sure you've entered the correct days and time.
It is not currently possible to edit a trading route.
To delete routes either click on the delete link next to the route or tick the check-boxes next to the routes you wish to delete then click the Delete button below.
Farm Assistant
The Farm Assistant allows you to easily send farming attacks to barbarian villages around you, either directly from the map or from recent attack reports in the Account Manager overview.
You can create two templates to configure different combinations of troops to send on farming attacks. For simplicity, these are called A and B.
Creating a new template
To create a new template click on New template underneath the Edit Templates section. A new section should appear on the right side of the page.
You can give your template a description to allow yourself to easily identify it in the future.
Once you've entered the desired troop combinations click Save to add the new template.
Editing or deleting a template
If you need to change the description or troops inside of a template you can edit it by clicking on the template description under the Edit Templates' section.
If you'd prefer to delete a template and start over from scratch you can click the red cross to the right of the template description.
Using the Farm Assistant from the map
Once you've set up one or two templates you can now use the Farm Assistant on the map. Note that you must have the Context menu enabled.
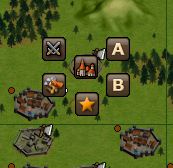
When clicking on a barbarian village you should now notice new icons labeled A and B. These correspond with the templates you created from within the Farm Assistant area. To send an attack simply click on the icon and the troops will be sent with no confirmation required.
Note that this only works on barbarian villages. It is not possible to attack a player owned village without going to the rally point and confirming the attack.
Using the Farm Assistant from the Account Manager overview
You can also use the Farm Assistant to send troops based on your recently received reports. You can do this from the Most recent plunders widget on the Overview.
The widget will show a list of recently received reports where you have attacked a barbarian village and looted resources.
Like the map, you can click on either A or B to send troops from one of your templates to the village.
There is also a C icon, which has a special functionality and does not relate to any of your templates. Clicking on C will use your most recent scout report to attempt to calculate and send the right amount of troops to loot all of the village's resources. You will receive a popup with the exact amount of troops sent.
You can only use the C icon if you have recently scouted the village.

